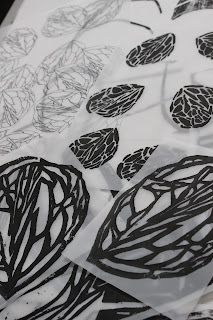
Series of completed artwork including sketches, drawings, collage work, watercolours and mixed media work was reviewed for the printed textiles design project without Photoshop as well as through Photoshop. The mix of individually drawn and printed stone, fossil, rock and crystal imagery for foregrounds and the larger printed and multi-media multiple imagery for backgrounds were used in the design process for screen printing.
Through Photoshop the scale of some of the imagery was altered and preferred over other artwork. Due to the scale of options for print it was initially difficult to select specific imagery. As the screen printing process continued more ideas were generated and a clearer rationale for selection was realised. As relatively inexperienced with screen printing I was increasingly informed by the process itself as I developed my own use of pattern.
I spent a lot of time comparing and contrasting imagery, playing around with shape, line, form, colour and texture before making my final decisions. I liked experimenting with the interplay of shape, line, texture and colour in print. I started to develop my original art work through the use of hand drawn imagery on Kodatrace with photo-opaque paint to add additional contrasts. I explored the use of negative and positive space with the same and different imagery.
As seen in the example above I increased the scale of some of my original line sketches of surface design from my sketchbook. I continued my preference for collage work and used ripped black card to block out and create interesting edges. I continued to use photo-opaque paint and lithography pastels to create interesting textures, shapes and line.
As above, this example proved to be quite dynamic in print so was used more. The use of ripping and hand drawing/painting with photo-opaque paint and lithography pastels proved to be impactful as all such detailing could be seen after exposure and screen printing in the printed image.
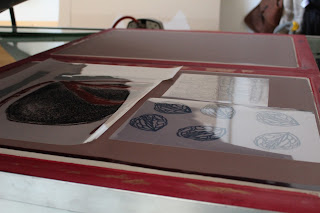
Finished artwork examples being sized up on the frames as preparation for exposure.
Other artwork was prepared for exposure
Every effort was made to utilise all the space which was available on the frames which I had purchased second hand from the print studio. The screens required to be prepared first through a process of cleaning, reapplying the sensitised emulsion. Gummed tape was placed round the edges of the frame to produce a well for the print pastes. The screens were also checked for any pin holes.
There was some deliberation concerning the availability of space as well as which image or series of images would be on the same or different frames given their intended use.
Many of the original artwork sketches and drawings were altered to achiever greater variation. Some of the multiple surface design hand prints were cut up and divided.
First series of artwork after exposure ready for screen printing
First series of artwork after exposure ready for screen printing
Third frame being prepared for exposure
Continuing preparation of artwork for exposure on the frame
Exposure time depended upon the type of exposure and the strength of the light source as well as the brand of emulsion with more opaque and solid images taking a longer exposure and more detailed designs requiring a shorter period.
The emphasis was not to expose screens for too short a period as this would result in the emulsion being unstable which would peel away. Too long an exposure would mean the emulsion would be difficult to remove.
Since the light source was strong the exposure times were relatively brief.
Once the exposure was completed the screens were cleaned and dried, then they were ready for printing
As above....screens being dried
Once the colours were selected then the different dyes were mixed using the recommended formula's including the degree of reactivity... in accordance with the strength of colour preferred to ensure the right thickness and viscosity for the print process. A number of different shades/tones of green and grey were mixed to allow for experimentation.
As an example...a number of test prints were made to acclimatise to the print process. Bricks were used to hold the frames in place and squeegees were used to fit the size of the frame/image.
The print paste was checked before use
Image above represented my first experience of screen printing
Due to the scale of preparation the degree of detail on the art work was replicated in the printed image.
After use the screens had to be cleaned immediately
And then left to dry a sufficient distance from the driers
Initial screen printing used white cotton fabric as I explored image placement/layout
The artwork which was used originally evolved from the crystal geode- its related positive and negative imagery was played with throughout the screen printing process.
Alongside white cottons, linens and silk I had dyed a range of natural fabrics to increasingly play with putting on and taking away colour
The design process became increasingly influenced by the contrasting use of shape, line and colour, of exploring pattern on pattern and repeats.
I particularly liked the contrasted imagery of increased scale, bold blocks of shape and texture against smaller more detailed intricate print
Example of initial test print
Increased development of screen printing process
Multiple pieces of fabric in use to enable continuous screen printing as frames were washed and dried
Experimentation of larger scale and colour
Test prints on paper to help inform the design process
Use of art work on Kodatrace, used as additional stencils
Use of art work on Kodatrace, used as additional stencils
Use of art work on Kodatrace, used as additional stencils
Use of art work on Kodatrace, used as additional stencils
Use of art work on Kodatrace, used as additional stencils
Use of art work on Kodatrace, used as additional stencils
Use of art work on Kodatrace, used as additional stencils
As the screen printing experiencing progressed I felt more confident to extend the use of colour and to experiment more with the layering of images.
I particularly liked the base colour of the fabric and the colour range used with the shape and line of the imagery. This print would suit increased scale.
I liked comparing the finished printed textiles once washed and steamed. I recognised the value of reviewing my work as I went along...this helped me to understand my design process and what the next series of steps would be...I plan to increase the scale in which I work for specific imagery, to create one off wall hangings which encapsulate a specific focal point.
I started to develop some themes as the imagery appeared to lend itself to such development. I plan to make screens from the printed textile above and below...
There was an increased focus upon complimentary colour themes which contrasted bold shapes with line
As above, I started to experiment with paper stencils from my artwork and blocks of colour
Different perspectives of completed printed textiles
Full length printed textile
Fuller view of printed textile
Detailed imagery of screen printed fabric
Detailed imagery of screen printed fabric
Detailed imagery of screen printed fabric
Detailed imagery of screen printed fabric
Increased use of personal archive of stones, rock, crystal, shells, flint hammer tool, fossils to create photographic imagery for print.
Further exploration of block colour through use of paper stencil's to create a range of shapes
Use of a range of colourways with different shapes, artwork and photographic imagery to good effect including discharge
Use of a range of colourways with different shapes, artwork and photographic imagery to good effect including discharge
Use of a range of colourways with different shapes, artwork and photographic imagery to good effect including discharge
Use of a range of colourways with different shapes, artwork and photographic imagery to good effect including discharge
Additional imagery of screen printing process


No comments:
Post a Comment